Tuesday, December 22, 2015

How to Make A Simple Doll's Dress Part 2

Following on from my last post, I wanted to share another of my designs for a simple doll's dress. You don't need any sewing skills to make this!

This design does have two big buttons (press stud style) but is, again, extremely simple to make and even more importantly, easy for your toddler to fit on her doll all by herself.

Ross calls this my Cube Design... which might make you think it could be something cool from the 70s... when in fact, it really does just look like a cube. :)  It might not be the most flattering design but it is the most practical design. No fuss. No tears. And Elise has hours of fun dressing Dolly all by herself without any help from any adult.

What you need (this design will fit a doll that is approximately cm tall):

  • If you're making a dress that is all one piece of material you'll need a piece of material 36cm wide x 27 cm high. If you want to make a two-tone dress (like the one featured, with polka dots and a block colour) you'll need two strips of material:  36cm wide x 10cm high and 36cm wide x 17cm high).
  • You'll also need a piece of material for the straps 11cm x 14cm (cut into two strips: 5.5cm x 14cm).
  • Two press stud buttons. Choose big ones that will be easy for your toddler to connect by herself.
  • Thread, needle, pins.
  • Embellishments - I have used a button. 

To make the dress:

1. Fold over one edge on each piece of material to create a mid-point seam, lie the two pieces of material on top of each other, pin and sew to create a seam across the chest of the dress. Obviously omit this step if you're using just one piece of material.


2. Hem the dress all the way around (the two sides, the baseline and the neckline).


3. Add big press stud buttons and sew them to the inner and outer seam.

4. Add straps. Simply fold your strips of material over to make them look neat, sew along the inside of the strap to finish it. Then attach it to your dress at the appropriate point. The straps vary from doll to doll so I can't give exact measurements here. Just put the dress on top of your doll to work out where the shoulder straps need to go.


5. Add a pretty embellishment, such as a button or ribbon:


 Here's another dress that I made using the same design (with slightly wider straps):


Hooray for easy doll's clothes!

Love and hugs,
Rebecca and Elise x

How to Make a Simple Doll's Dress

How many times does your toddler have a meltdown because she does not have the ability (yet) to dress her doll in the clothes the doll came with? I am amazed by some of the clothes toy companies manufacture. Why are they so tight? Why are they so fiddly? And why oh why are the designs sometimes better suited to a pole dancer rather than to a child's doll?

Toy companies seem to have forgotten that the average 3-5 year old has an attention span of about 20 seconds and that, coupled with the fact that their fine motor skills are only just developing makes it phenomenally difficult for most toddlers to dress their dolls by themselves. And here's the rub: all they want to do is do EVERYTHING for themselves at this age.

And so ... there's my problem and here's my solution.  

I'm no seamstress. But I do really, really enjoy sewing simple creative projects, especially if they bring some fun and joy to Elise.She adores dressing her doll and asked me the other day if Dolly could have some more clothes. "Why not?" I thought. So Elise and I went to our favourite Spotlight shop, bought some material off-cuts and off I went.

My latest design is extremely simple and will fit a doll that is approximately  cm tall. The crucial bit is this: the design is so simple even a 3 year old could dress her doll with this dress and do it all by herself. No meltdowns. No stress. Happy lives for all. :)

All you need is:
  • Some pretty fabric (for this design I have chosen a lime green and purple for the straps)
  • Some elastic
  • Thread, needle and pins
  • And some pretty bow embellishments if you want them (more on that later)


So let's get started!

How to make the dress

1. Cut out a piece of material 48cm wide x 26cm long. The width needs to be long because you'll gather it together at the neckline to create a ruffled look. It might seem ridiculously big for the size of your doll but it will all make sense soon!

2. Lie the material in front of you, with the width running along the top and create a neckline hem. You want to create a wide hem because this is where you'll run your elastic later. Pin the hem down to keep everything level.

Step 2


3. When you sew the hem, you want to keep a really tight stitch that is close to the edge. This will allow for your elastic to move easily through the hem.

Step 3


4. Next get a safety pin and thread it through the elastic. Don't cut the elastic yet! Thread the elastic through the hem (if you've left plenty space, this will take about a minute to do):

Step 4

5. Loop the finished hem around your doll to make sure you make it tight enough (I suggest making it tighter than the circumference of the doll's chest) and sew the two ends of elastic together. Make sure it is very secure... the more you sew and knot the thread around the two ends of elastic, the better.

Step 5


6. Now the dress looks like a cone, with a tighter elastic 'neck' and a wider base. Turn the dress inside out and pin the two open sides together. Sew them together to make the back hem.
Step 6b Pin the two edges together

Step 6a Fold your two edges over 

Step 6c Turn the dress the right way out and marvel at your skilled straight seam! I did!


7. Nearly there! You just need to hem the base of the dress now to suit the height of your doll:

Step 7


How to make the straps

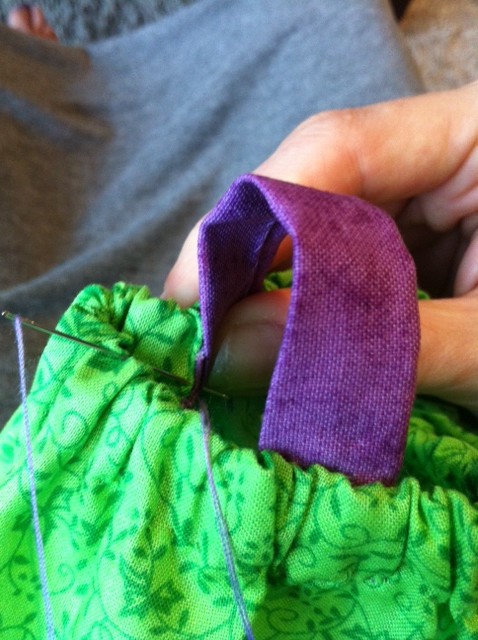
8. Now for the shoulder straps. Cut out a piece of material roughly 11cm wide x 14cm high. And then divide it into two equal strips (5.5cm x 14cm). Turn over the rough edges to create a seam on the inside of each strap, pin it and sew it up.

Step 8


9. Turn over the end of one strap and sew it into the dress at the appropriate spot (over dolly's shoulder). You might find it easier at first to pin it and secure it in place.

Step 9
Step 9


10. Then do the same for the back-strap attachment. Be mindful to sew all the way around the strap - for example make sure the front of the dress is also attached to the strap with some 'invisible' sewing! See picture 10b. Then repeat for your second strap.

Step 10a
Step 10b


11. Add any embellishments. I've used some cute bows which I bought from our $2 shop and then just sewed them on like I would a button. I've seen all sorts of embellishments: pretty images you can iron onto the fabric; buttons; ribbon; beads... the list is really endless!

And voila! A cute and easy dress to make and more importantly... a dress that Elise can easily put on her doll without any assistance from an adult.


Here's another dress I have made using the same simple design:


Happy sewing and happy play time!

Love and hugs,
Rebecca and Elise x

Tuesday, December 1, 2015

Positions for Labour

With only 11 weeks until my due date (15 February 2016), I am starting to think about the birth itself. I'm not concerned about it - on the contrary, I am extremely excited about 'D Day'!

My 28 week bump!


I know so many mums who have had difficult births. By that I mean long labours. Painful labours and births. Disappointments.

Many say the most important thing is that the baby came out safe. And of course that is the most important aspect: that you and your newborn are both safe and well.

But there has to be more to it than that. One thing is always certain with birth: the baby will come out. But what I think a lot of people miss is that you have plenty of opportunity to determine how that baby will come out.

My Own Positive Experiences

I have never wanted to feel robbed by any birthing experience. I'm extremely fortunate to have had a very positive first birthing experience and I am determined to have the same sort of experience this time round.

Much of my own thinking about birth, I've realised, comes from my own mum's positive perspectives on birthing. My brother and I were both born naturally - my mum had a bit of gas and air and she focused on being as relaxed as she could until we were born. So much so, she was watching a film at home when she went into labour with my brother and refused to leave for hospital until her film had finished. Mum has only ever talked about the 'ease of birth' to me and as a result, I have only ever believed it to be a straight forward process.

This is why I always actively avoid women who want to share their horror stories with me. They add no value to me as a pregnant woman - who wants to hear about someone else's 65 hour labour or birthing agony when you are faced with your own birth in a few short months??

Birthing Preparation

Preparation is absolutely key to a pleasant birthing experience. I prefer to listen to my hypnobirthing CDs; practice my hypno breathing; research videos of women giving birth naturally and pleasantly; doing yoga that focuses on my pelvic area; and stretching.

It's also really valuable to have thought about what positions you might want to birth in when the day comes. Obviously you might be really lucky and have a really quick labour and birth, but the positions are really useful all the same.

Gravity is a really key aspect of birthing naturally - the more you move around and the more you are upright, the better. So standing, sitting and squatting are all really good upright positions that will help gravity help you bring your baby into the world.

Here's a fab article, with illustrations, on good natural birthing positions ... 

And here's another one!

Happy birthing ladies!
Rebecca x

Ariel Birthday Cake - Elise turns 4!

For her birthday Elise can bring a cake into school... and seeing  as I love making cakes and getting all creative, I thought well why shouldn't I do two cakes this year?
Elise is mildly obsessed with both Ariel the Mermaid and Elsa from Frozen so these have become the themes for her two cakes.

I plan to keep the one for playschool simple, cheap and fun. It's going to be a number '4' shape with red and green icing, inkeeping with Ariel's colour scheme.

Incase you're unfamiliar with Ariel, she looks a bit like this, maybe without the socks:


In preparation I have done the following:

1. Done some research on the internet for a cake topper. I found this pretty green photoframe, complete with Ariel, and then added (in PowerPoint) the type saying Happy Birthday Elise. I laminated it on both sides (if you want to use really wide cellotape it does the same job) then cut it out:


2. Looked for some pictures of the two main animals in The Little Mermaid. These are Flounder (a fish) and Sebastian (a hermit crab). I've copied them from the internet, then pasted them into PowerPoint slide and then added a circle around them. I've also added some numbers 1 -2 -3 -4... Elise will be four and I thought it would be fun for her and her friends to count to 4 when the cake arrives. :) I've also found some seaweed graphics... all will become apparent soon enough!


To make the cake decorations:

1. Print your images onto decent paper (suggest 100gsm minimum).

2. Cut all your shapes out. There are 4 images and so I need 8 seaweeds and 8 mini cocktail sticks...

3. Turn one seaweed cut-out over and glue a cocktail stick down so that about half of the stick sticks out. Then glue the other seaweed cutout to the back.

Step 3


4. Glue your number 4 image (mine is a fish) together but again put a cocktail stick inside to give it some strength.

Step 4


5. Slide the number 4 image into the seaweed and glue the seaweed over it. Hopefully your number image is quite stable. :) Repeat these steps for each of your number images and then you'll have 4 fun sticks to poke into your cake!

Step 5 

Baking Elise's 4th Birthday Cake... A Number 4 Cake!

Elise is turning 4 this weekend and we are very excited! She's actually having two cakes this year - one for her classmates at play school and one at her party. Never before have I made two cakes for one birthday party... but I'm sure it won't be the last time.

For her play school she's asked if we can have an Ariel cake - from A Little Mermaid. Truthfully I didn't want to spend ages doing this cake as I know the second cake for her party is going to be challenging so I wanted to keep this one simple.

Princess Ariel from A Little Mermaid


The basic colours for Ariel are red and green - red for her hair and green for her tail... so I decided to stick to those colours and opt for an easy cake design: a numerical cake.

I used a basic chocolate cake recipe to bake the cake. Elise really enjoyed helping weigh the ingredients and watching them blend together. It's not every day I partner up with Queen Elsa of Arendelle either when I'm baking!

Queen Elsa is very handy in the kitchen!


I also made sure that the baking tin we used was about the size of an A4 sheet of paper so that the '4' that I had drawn and cut out, fit. 

I turned the cake out onto a chopping board (so it is actually upside down in the photo below) and placed my cut out number 4 on top (the number is also back to front). Next, I used a cocktail stick to draw tiny little dots around the number 4 so that I had a guideline to follow when cutting out the 4 shape:

A cocktail stick is a great way to draw a line on a cake
You can see the dots and '4' outline
Next, I cut out the number 4 shape with a knife. To get your number 4 the right way round, you need to place your serving tray over the cake (I used a big silver one) and swiftly turn the cake over.


Now you're ready to make icing! In all fairness, children only like licking the icing off cakes - have you noticed how they all just lick the icing off and have a little bite out of the cake before discarding it?!

Elise and I made a batch of buttercream icing and divided it in two. We coloured one with green colouring and the other with red. You can just use a spoon to blend the colours into the basic icing, but Elise enjoyed watching our blender at work again:

Mmmmm icing... can I have some mum? Can I? Can I?


So now comes the fun bit: icing the cake! Just using a simple flower shaped icing tip and plastic bag, I dotted lots of green stars onto the base of the cake, adding a few long strips that I thought looked a bit like seaweed retrospectively. If I'd thought of it sooner, I would have made those lines wiggly so they did resemble seaweed moving in the current... but I didn't and you can't have everything!

The green icing which I could have made look more like seaweed but never mind.

Then I added some red and four red dots, where the candles will go:


Tip: when using buttercream icing, you have to work super quickly. Because the base of the icing is made from butter, it melts very quickly and your stars will start looking more like splats.

But no fear. Just keep putting your icing bag back in the fridge for a few minutes (as well as the cake if you think it's melting too) and let it firm up before continuing.

If you want to find out how I made the cake decorations, click here.

And the final touches to make your cake even more special: